Table of Contents
Remember being a kid and feeling the absolute thrill of launching something into the sky? You didn’t need millions of dollars or a NASA control room. You just needed some plastic, some tape, and a whole lot of pressure.
Building a bottle rocket is the ultimate rite of passage for any young scientist. It teaches you the fundamentals of physics—specifically, Sir Isaac Newton’s Third Law of Motion: “For every action, there is an equal and opposite reaction.” When you force water and air out of the bottom of a bottle, the bottle has nowhere to go but up.
But here is the catch: when you are dealing with pressurized air, things can get dangerous quickly if you don’t know what you are doing. Let’s break down exactly how to build a high-flying bottle rocket that won’t blow up in your face.
The Physics of the Launch
Before we start taping fins to plastic, you need to understand the fuel. We aren’t using fire. We are using compressed air and water.
Why water? Why not just air?
Because air is incredibly light. If you only pump air into the bottle, it escapes instantly, giving you a tiny, pathetic little pop. Water is heavy (dense). When the pressurized air expands, it shoves the heavy water out of the nozzle at high speed. Pushing that heavy mass downward is what creates the massive upward thrust needed to launch the rocket hundreds of feet into the air.
For a deep dive into the math behind this, the NASA Glenn Research Center has an incredible guide specifically written for students building water rockets.
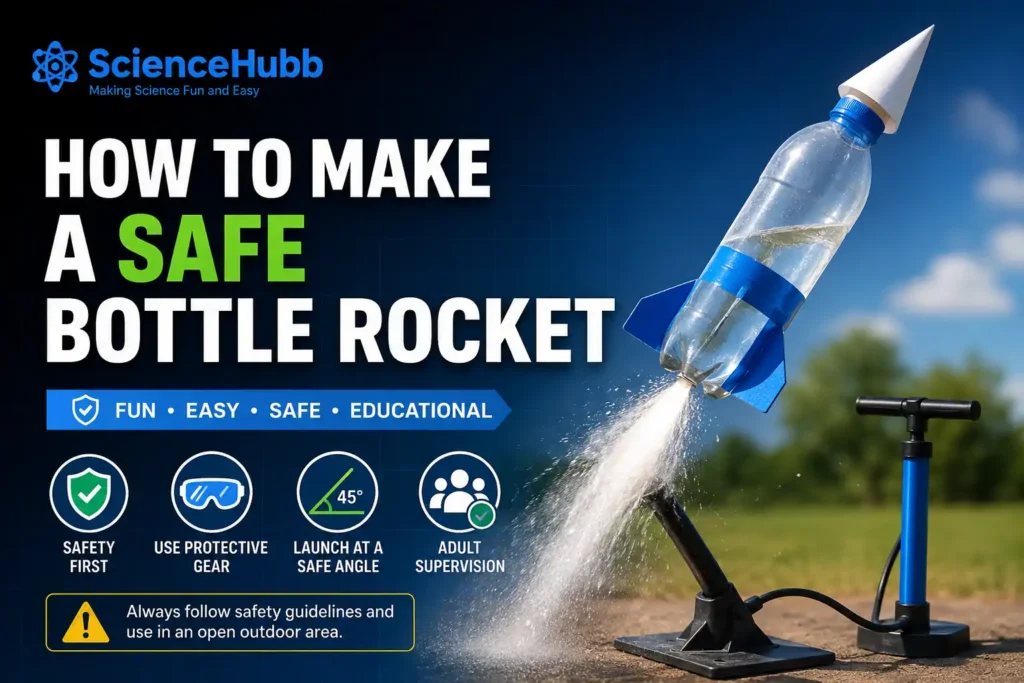
What You Need (The Safe Materials)
To build this safely, you must strictly avoid glass or brittle plastics. When they break under pressure, they shatter into dangerous shrapnel.
You will need:
– A 2-Liter Soda Bottle: (Carbonated soda bottles are designed to hold pressure. Do not use flimsy water bottles.)
– Cardboard or Foam Board: For the aerodynamic fins.
– Duct Tape: To hold it all together.
– A Cork or Rubber Stopper: To plug the bottom.
– A Bicycle Pump with a Needle: To add the pressure.
If you don’t want to mess around with DIY corks and want a guaranteed, safe launch mechanism, you should absolutely grab the Aquapod Water Rocket Launcher on Amazon. It comes with a built-in safety valve to prevent over-pressurization.
The Assembly: Fins and Nose Cones
A bottle flying naked through the air will tumble out of control. It needs aerodynamics.
1. The Fins: Cut three identical triangles out of your foam board. Tape them securely to the bottom half of the bottle (the part pointing down during launch). Make sure they are perfectly straight. If they are crooked, your rocket will spin wildly and crash.
2. The Nose Cone: The flat bottom of the soda bottle is terrible for slicing through the air. Take a second bottle, cut off the top half, and tape it upside down onto the bottom of your rocket to create a smooth, aerodynamic point.
Want to see how professional rocketeers handle aerodynamics? Check out the designs over at the National Association of Rocketry.
The Launch Sequence (Safety First)
Head to a massive, wide-open park. Do not do this in a small backyard.
1. Fill the bottle exactly one-third full of water.
2. Shove the cork tightly into the nozzle. Make sure your bicycle pump needle is shoved straight through the cork.
3. Stand back. Start pumping.
4. As the pressure builds, the cork will eventually fail. When the friction can no longer hold the cork in, the water will blast downward, and the rocket will scream into the sky!
For extra safety gear, grab some Professional Safety Goggles before you launch.
10 High-Flying Riddles
Let’s see if your brain is ready for liftoff.
1. The Riddle: I am the famous physicist who realized that every action has an equal and opposite reaction. Who am I?
The Answer: Sir Isaac Newton.
2. The Riddle: I am the heavy, dense liquid used as the primary “fuel” in a safe bottle rocket. What am I?
The Answer: Water.
3. The Riddle: I am the invisible gas you manually pump into the bottle to create the massive pressure. What am I?
The Answer: Air.
4. The Riddle: I am the triangular shapes taped to the side of the rocket to keep it flying perfectly straight. What am I?
The Answer: The fins.
5. The Riddle: I am the specific type of plastic bottle you must use because I am designed to hold carbonated pressure. What am I?
The Answer: A 2-Liter Soda Bottle.
6. The Riddle: I am the pointed tip added to the top of the rocket to help it smoothly slice through the air. What am I?
The Answer: The nose cone.
7. The Riddle: I am the small, rubbery plug used to seal the water and air inside the bottle until the pressure gets too high. What am I?
The Answer: A cork (or stopper).
8. The Riddle: I am the upward pushing force created when the water violently escapes the bottom of the bottle. What am I?
The Answer: Thrust.
9. The Riddle: I am the manual tool you use to pump the air into the rocket before liftoff. What am I?
The Answer: A bicycle pump.
10. The Riddle: I am the science of how air flows smoothly over objects in flight. What am I?
The Answer: Aerodynamics.
The Wrap Up
Building a bottle rocket is the purest form of hands-on physics. You learn exactly how mass, pressure, and aerodynamics work together to conquer gravity.
To take your rocketry to the next level, read up on advanced launch dynamics at Science Buddies. Stay safe, wear your goggles, and look up!